Saturday, July 31, 2010

Adenium Given A Haircut

I felt bad about indirectly killing the caterpillar 'Ah Pui' that I kept as captive in order to watch its metamorphosis process. Since then, I stopped removing caterpillars that visit my garden. Call that generosity.....or guilt-ridden! Ha ha...
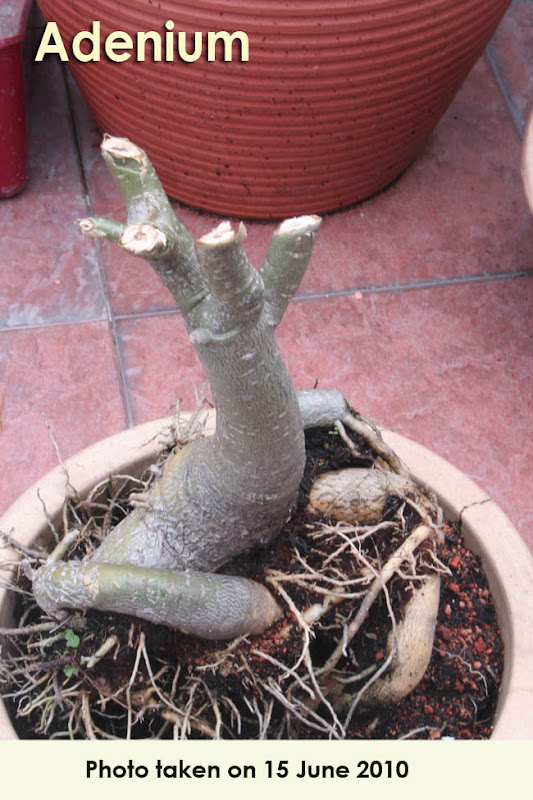
Last month, I had another caterpillars visit to my Adenium plant. They ate the leaves voraciously and I was left with rather ugly plants. So I trimmed all the leaves and trunks off.

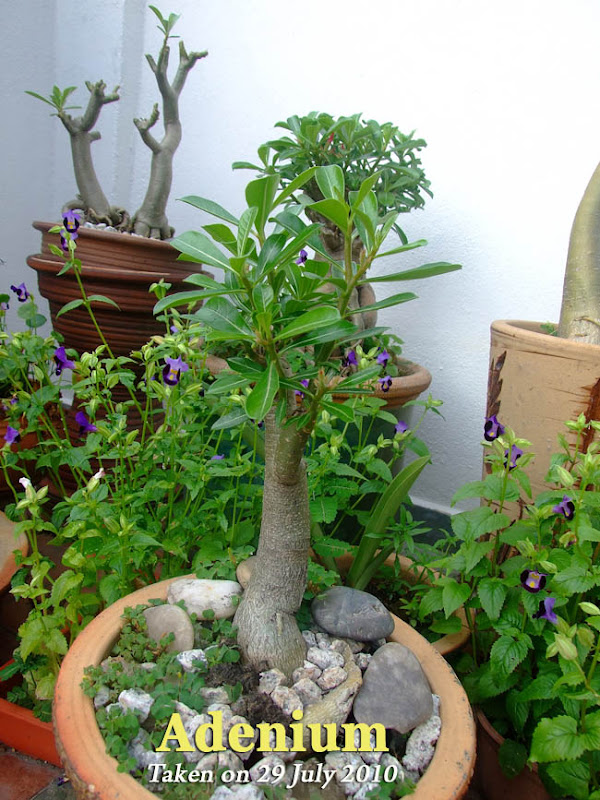
In one and a half month, this is how it looks!!! Beautiful, right? With buds appearing too!
Of course lotsa organic fertilizer helped in the quick growth. I have also uprooted the plant to reveal its caudex (root). Regular uprooting of Adenium will encourage the caudex to grow bigger. In addition, I have bought some sand and add them to my soil mixture. In the previous re-potting exercise, I have added too much of peat soil. As the peat soil retains water, during continuous raining, I found some root rot. Adenium needs soil that drains well. This is also another reason why I uproot the plant, i.e. to check on the root and change the soil mix.
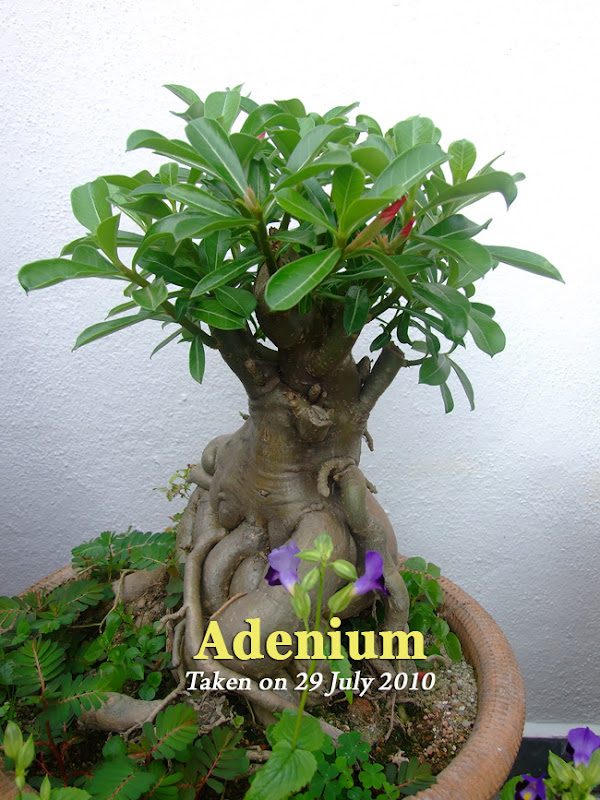
When my friend, Rox, who also loves growing Adenium told me that regular trimming of Adenium would make the plant looks better. I had my hesitation and doubts as it takes some time for the plant to grow, so why trim them off? After my first trimming, I never stop doing it on a regular basis! Read more about Trimming Adenium here.


I didn't take any photo of the above Adenium after its haircut. It certainly has a better styled hairdo now. Trust me!


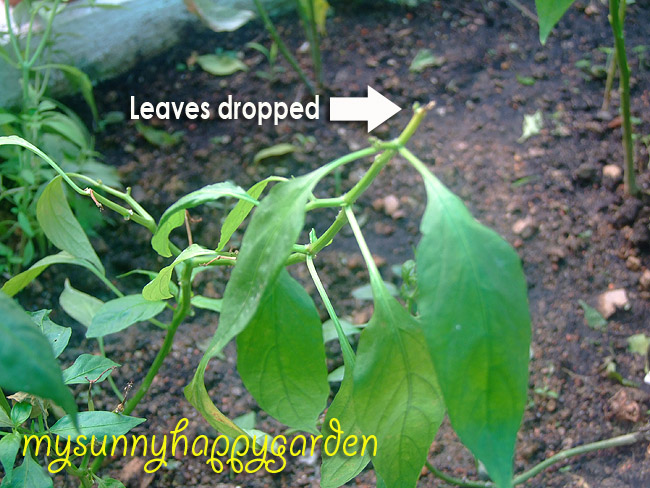
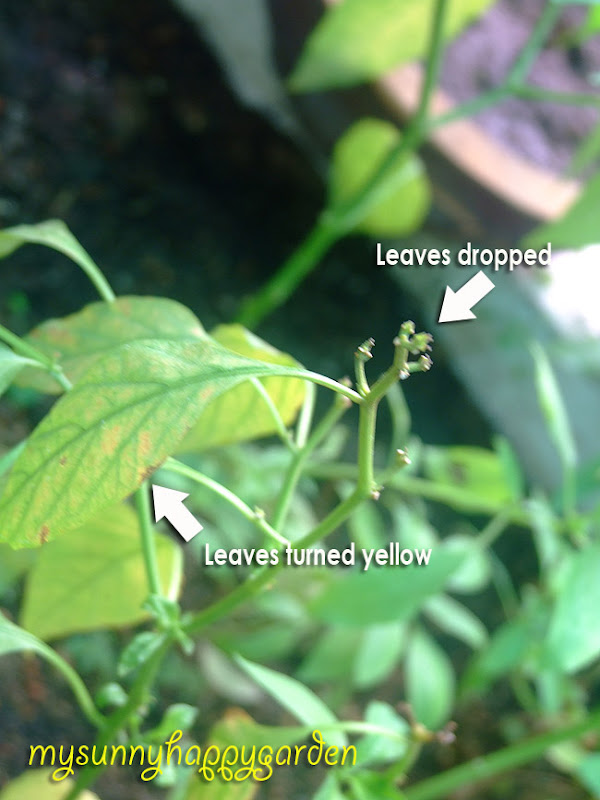
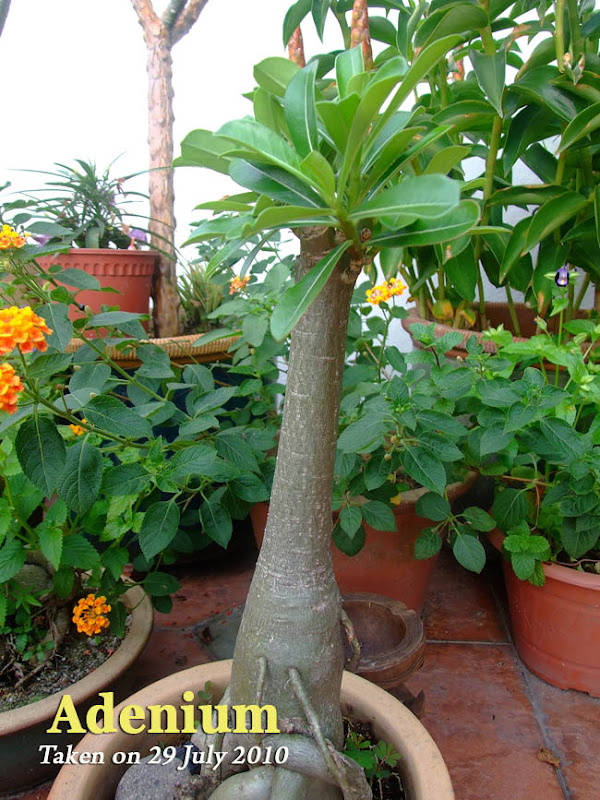
Due to poor drainage soil, the root of this Adenium rot too! Fortunately I discovered it early and was able to salvage the plant. One of the signs of the root rot was leaves turning yellow and began to drop off.

With new leaves and buds growing, it looks much healthier. Adenium feeds on fertilizer voraciously. Another tips from Rox, she feeds her Adenium with chicken dung and they bloom non-stop. I blogged about her garden and Adenium here. Check out photos of her Adenium blooms and drool!! Ha ha...

Another lush Adenium growing after being turned bald last month!

Friday, July 30, 2010

My 1st Radish Harvest

My sister said if I were to grow vegetable for my own sustainance, I would be dying of hunger!! Why?

The yield that I get from my garden is sooooooooo miserable! Ha ha!!! But I don't think it's the yield that matters. The whole process of germinating seeds, watering & fertilizing the plants, watching with delight as they grow bigger and taller, eventually bearing fruits are filled with fun! It would need a fellow gardening enthusiast, like you and me, to understand what the feeling is right!

See the stages that I went through to grow radish till I was able to enjoy the fruit of my labour!


Out of the many radish plants that I have, only one radish tuber of sufficient size was harvested yesterday. I pulled up some of the plants as they don't show much sign of tuber growing from it. See the lush leaves of the radish in the pot above. One would expect to see lotsa radishes growing beneath the soil. Alas, that wasn't the case! Did I overcrowded this fellas till they don't have enough space to grow?

Although the radish tuber is still small, I decided to harvest it after reading on the internet that radish tuber needs to grow fast and have sufficient water. Otherwise, you will end up with a fibrous radish that may be inedible. So, I would rather opt for a small tuber than an inedible one.

I was so proud of my little harvest here!! It took a lot of tender, loving, care for the seeds to reach this stage!!


A plant with no tuber growing. What happened???

I decided to make my favourite radish & carrot pickle that evening. Fresh radish for dinner!


Although it's just a tiny radish, I am not giving up! I will start to germinate the remaining radish seeds again.
Happy gardening my fellow friends out there!

Sunday, July 25, 2010

Tips from United Malaysian Orchid

My friend, Chooi, brought me to visit United Malaysian Orchid nursery in Rawang recently. For those who grows orchids, you may be familiar with this nursery. United Malaysian Orchid nursery was once located at the junction of Jalan Glenmarie & Jalan Subang. A few years ago it moved to its new location in Rawang.


As this nursery was close to where I live, i.e. UEP Subang Jaya, I used to hang out at the nursery on weekends where I pick up a few tips from one of its workers, Ah Meng, and watching them worked with their orchids. He is very popular with orchid growers as he patiently teach us how to upkeep our orchids. He also recommended his special powder fertilizer for orchids. This fertilizer is diluted in water and when sprayed daily on your orchids, you will be assured to get multiple blooms regularly. That's how I used to take care of my orchids in the past.


I have not seen Ah Meng for several years after the nursery moved. Glad to be re-acquainted with him again. In fact, I brought Chooi to its old site in Glenmarie several years ago, and found out that the nursery has moved. I only learnt that United Malaysian Orchid nursery has moved to Rawang when I stumbled upon their booth at last year's Floria Fest in Putrajaya.

From my trip to this nursery, I have found some interesting gardening tools and tips to share here. The first one would be this home-made multiple pots holder.

It is made by stucking a tree trunk into a pot and filled the pot with cement in order to support the trunk. Then nailed several pots onto the tree trunk. Voila! You have a beautiful multiple pot holder! How innovative!

See how beautiful the pot holder looks when pots of orchids are placed on it. To ensure you have a lot of mobility & flexibility with this multiple pot holder, do not grow your plant directly into those pots that are nailed into the tree trunk. Instead grow your pots in a separate pot and place the pot onto pots in the holder (refer to photo below). As such, you have the flexibility to change and rotate the plants placed on this holder.


The above home-made multiple pots holder is very cost-efficient to make. I have seen a multi-tiered pot for sale during the Putrajaya Floria Fest 2010. It is made of plastic and have 3 tiers.


The price for the 2 varieties of multi-tiered pots can be quite damaging to our pockets.
So, if you are thinking of saving some money, why not take out your DIY tools and make the innovative multiple pot holders from United Malaysian Orchids.


Another interesting thing that I saw at this nursery is the usage of hair grip/clip to hold an orchid stalk to a stake. Of course we can always use a wire to do this, however with a hair grip (as seen in the photo below), one can easily re-adjust or remove it.

Ah Meng also showed us a new product that his nursery is selling. It is a dual nozzle spray that can be used on the mouth of a 1-liter plastic drink bottle. This is another way of recycling the mineral water or soft drinks plastic bottle.

Ah Meng demonstrated to us how this dual nozzle spray worked. The dual nozzle produces mist in a wider radius that enable the water to cover more plants with each spray. He claimed that this spray is more durable and lasting. It is very suitable for spraying liquid fertilizer that orchid growers commonly used.


Both Chooi and I had a good time at the nursery. We learnt a few new things and glad to meet up with Ah Meng again.

In case any of you are keen to check out this nursery, the contact details and map to United Malaysian Orchid are enclosed below. Frankly, I have doubts about driving there myself as I cannot recall the route we took. Anyway, what's life without some adventure? Try to hunt for this nursery if you can. Your journey will be a worthwhile one!


Saturday, July 17, 2010

Updates from My Garden

What have been growing in my garden?

My first chilli hanging on the plant.


My chilli plant is suffering from 'leaf-loss' and yellowing leaves. This is the balding part of my chilli plant. I wonder if any hairloss shampoo will help?? Or is this due to attack of mealybugs? I have been spraying some of my chilli plants with a concoction of garlic, bird's eye chilli & dish detergent.


From my visit to CETDEM's Organik Day event, I am able to solve this puzzle on why I have 'Ulam Raja' and Japanese Ginseng plants growing in my garden. The seeds of these plants were accidentally included in the pack of Marigold seeds that I bought. Ha ha...isn't that good news! Buy 1 free 2. Seen here is my one and only Ulam Raja, growing healthily. During my recent trip to Kerteh, I have eaten a lot of this herb with rice during lunch time.


I think this is a Balsam plant. I suspect the seed for this plant was included in the pack of Marigold seeds that I bought from CETDEM in April. Would anyone be able to confirm for me if this is a Balsam plant?


For the benefit of fellow gardener, Ting, from Growing Vegetables with Ms. Green Fingers, who asked how a garlic plant looks like. Here is the garlic bulb that I placed into the ground and left to grow. I was away for several days and some of the leaves had browned and wilted. The plant looks like spring onion, don't you agree?


A Yen Kee pineapple that I bought came with a slip at the bottom of the plant. The fruit seller told me that I can grow the pineapple from this slip. Yen Kee pineapple are widely grown in Klang and this pinepple produces sweet fruit that is less fibrous than our local type of pineapple. Root has sprouted from this slip. However the growth seems to be very slow.


My radish plants are flourishing well. You can see a radish bulb peeping out from the soil. I read on the internet that radish must be grown quickly to ensure that the bulb will be plump and tender. If it is lacked of water, it will grow to be hard and dry. Radish also need several hours of direct sunlight to grow well.


I think I have overcrowded my radishes. The bulbs may not grow to be big. Never mind. This is my first experience of growing radish. I shall learn from this mistake.


Our new neighbour, Uncle Tong, offered me 2 bulbs of Calathea Makoyana when he re-potted his plant. I have seen admiring the foliage of this sold at Giant Hypermarket and had been admiring Uncle Tong's plant from afar. He made my day when he offered those bulbs to me!


Calathea makoyana is also called Peacock Plant because of the decorative color patterns of the upper leave surface. The leaves are being hold on long thin stems and do have a remarkable capability to adjust their position to the angle of light. Growing up to 2' ( 60 cm ) and preferring filtered sunlight.

Saturday, July 10, 2010

CETDEM's Organik Day

Did anyone go to CETDEM's Organik Day in SS19 PJ last Sunday?

I was there about 9.30am with two friends. Fortunately we went there early. By 11.30am, the sky has turned dark and we rushed to our car before it started to drizzle.

Let's walk through the Organik Day event with these photos that I had taken.

CETDEM's stall.


My favourite stall was the one where seeds were sold. There were vof seeds, ranging from flowers to vegetables. This time around, I bought 2 packets of seeds, i.e. coriander and kangkung (water convolvulus).


A stall selling vermicompost brought some earthworms to share with the public on how vermicompost is being produced.

Stalls selling seedlings of various herbs.


Organic tea & teabags and preserves for sales.


Seaweed is also available for sale.


Waiting for our turn to go for the guided tour of CETDEM's organic garden.


These are some of the plants from CETDEM's garden.


LinkWithin

Related Posts Widget for Blogs by LinkWithin
Custom Search